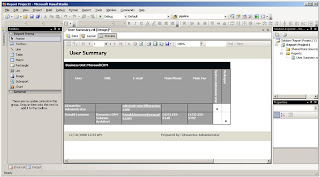
There are quite some reports in the out of the box installation of Dynamics CRM 4.0, but these sometimes do not match the exact business requirements. Also the reports which can be created by using the Dynamics CRM Report Builder Wizard cannot contain complex calculations or information of more than two entities. When you do export one of these reports and try to edit this in Visual Studio, then you will end up with errors. This post will guide you through these errors and modify a default report. For this example we will change the default “User Summary” report. This of course works for reports generated with the Report Wizard as well.
Exporting a report
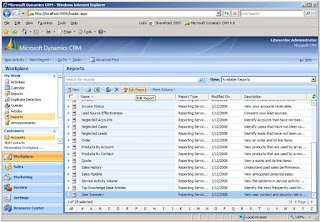
The first step is to download a report from Dynamics CRM. You can do this by browsing to the Workplace and open the reports are. In the grid select the report which you want to modify and press “Edit Report”.
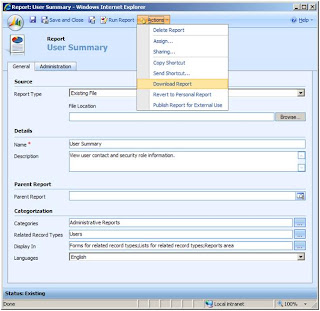
Clicking on “Edit Report” will open the Report Detail page. On this page click “Actions” and select “Download Report”. This will let you download the *.rdl file which is the definition of the report. Save this file to some location on your hard drive.
Opening the report in Visual Studio 2005
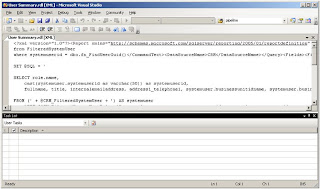
Keep in mind that the report must be opened in an editor which supports the rdl for SQL Server 2005. For Visual Studio this is version 2005. With 2008 you cannot change report files for CRM. When you directly open the report in Visual Studio you will see that the xml viewer will be opened.
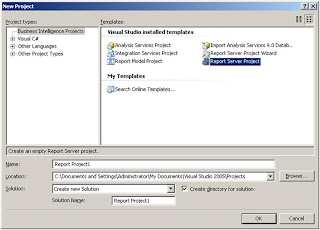
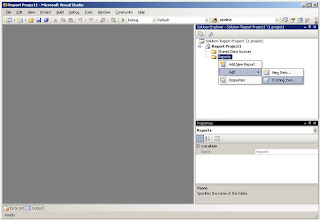
Although you can modify a report in XML, there is an easier way to modify reports in Visual Studio. You will first need to set up a project for Reports. In Visual Studio select the “Report Server Project” from the “Business Intelligence Projects” group. If this is not available, install the “Business Intelligence Development Studio Add-In for Visual Studio 2005” from the SQL Server installation CD.
From the “Solution Explorer” right click on “Reports” and add an existing Report. From the report selection screen select the report which you have saved in the previous step.
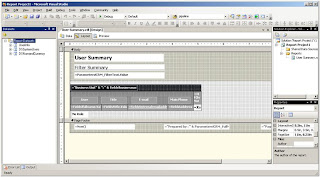
The report will now be added to the solution under the reports tree view item. When you open this report now, you will get into a mode in which you can modify the report.
Connecting to Dynamics CRM
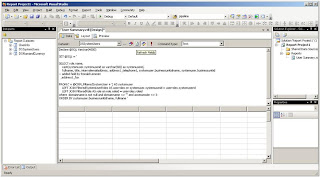
The report does have three tabs for defining the dataset, modifying the layout and previewing the report output. The first step in changing a report is to change the dataset. Every report which is exported from Dynamics CRM does have a hardcoded data source set. This will need to be changed to your current environment before you can modify the report. To do this click on the “Data” tab. You will get the following error message.
A connection cannot be made to the database. Set and test the connection string:
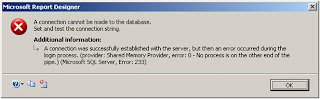
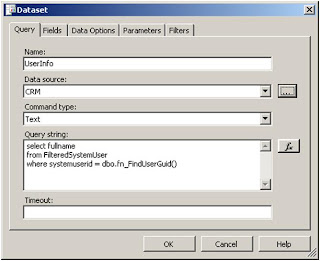
This is the message specifying the situation as I have just described. Just click “OK” and let’s change the data source. To do this click on the “…” next to the dataset pick list.
This will give you the “Dataset” detail form. On this form click on “…” next to the data source picklist.
This will give you the “Data Source” detail form. On this screen click on Edit next to the connection string.
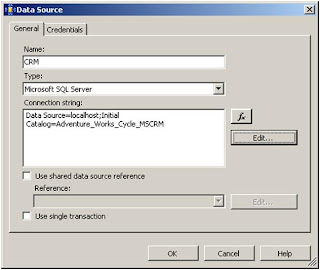
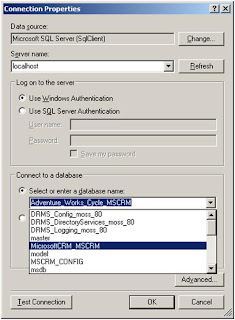
This will give you the “Connection Properties” detail form. On this page verify that the server name is correct. Also select the correct database name. This should be in the format of “organizationname_MSCRM”.
After clicking on “OK” several times you will get back to the main screen. This will be refreshed and more information will be visible now.
Changing the Query
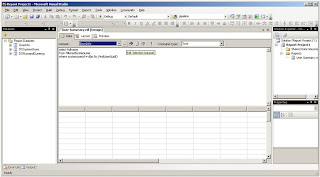
Now that a connection is created you can change the query. Unfortunately there is not just a single query. There are multiple Datasets with each a separate query. You’ll first need to find the correct Dataset before you start changing the query. By looking at the queries you will probably be able to determine which dataset you should use. Most likely the query starts with the declaration of a dynamic query like “Declare @SQL Varchar(4000)”.
Once you have found the query you can modify the query. I do expect that the people reading this article do have knowledge of how to change these queries, if not than you might want to find somebody else to change the query for you.
Once the query is modified and does return the attributes you want to use in your report, then there is an important step you should execute. If you miss the following steps, then you’ll get this error messsage “An error occurred during the local report processing. The definition of the report '/User Summary' is invalid.”. For some reason Visual Studio removes the “Fields” from the dataset. This basically is the mapping between the attributes returned by the query and the variables used in the report. You can verify that the list of Fields is empty by opening the Dataset detail form (click on the “…” next to the dataset pick list). On the Dataset detail form click “Fields”.
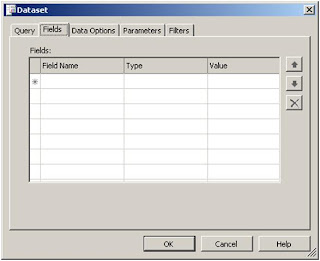
You can manually enter each of the fields and values, but you can also let Visual Studio regenerate this list. To generate this list you can click the “Refresh Fields” in the Dataset toolbar.
Clicking this toolbar button will ask you to define query parameters.

This screen doesn’t automatically fill the default values, but the values are available in the report though. You can find the values which you should fill in here on the “Report Parameters”. You can access these from the “Layout“ tab. Somewhere on the layout screen right click outside of the report somewhere on the yellow piece. This will give you a context menu where you can select the “Report Parameters”.
On the “Report Parameters” form you can select the property on the left side on the screen and at the right bottom you can find the default value for the selected property.
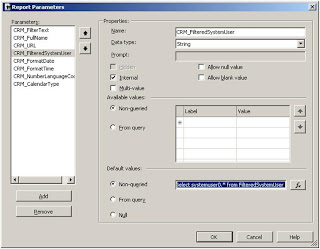
Copy the default value and past this into the “Parameter Value” for the “Parameter Name”.
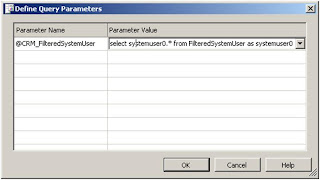
Now click “OK” and the query is changed AND you can use the selected attributes in the report layout editor.
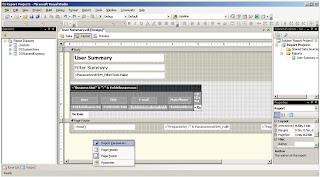
Changing the Layout
The layout can be changed on the “Layout” tab of the report. There are many possibilities to change the layout, but I won’t dive into the Reporting Services possibilities. I will just show how to add the field which is added to the query, but for more information you should look into Reporting Services trainings.
To add a field to the result table select the table and right click on the header. You’ll now get a context menu which will allow you to add a row group. This is the value you need to select to add a column. In the “Expression” field you should select your newly added attribute in this format “=Fields!address1_fax.Value”. For the label you could add a Textbox from the toolbox and change its properties to match the existing labels, but you could also just copy an existing label and change the text value.

Previewing the Report
To review the report, just click the “Preview” tab. If necessary you can go back to the Layout or Data tab to change the report. When you are ready, then save the report to an *.rdl file.
Updating the report in CRM
In Dynamics CRM, go back to the Reports area in the Workplace module. In the grid select the report which you have just modified. In the toolbar click on “Edit Report”.
On the Report detail form select the saved report definition file by using the browse button for the file location. Now press “Save” or “Save and Close” and your report is updated with your new definition file. From CRM you can now run the updated report.


