Showing posts with label javascript. Show all posts


Close Campaign Response window

Did you ever notice that you will get an warning message when you close a new Campaign Response window? The message you will get is:


Are you sure you want to navigate away from this page?
Your changes have not been saved. To stay on the page so that you can save your changes, click Cancel.
Press OK to continue, or Cancel to stay on the current page.
OK Cancel

You do get this message because Microsoft is automatically filling the Received On attribute. This does set the modified flag on this attribute and the close screen event will recognize this flag. To remove the flag, you will need to reset the value for Received On by using a very simple script like this:

//Receivedon is automatically filled. Setting this value to null prevents a warning when closing the screen.
crmForm.all.receivedon.DataValue = null;

When you bind this script to the OnLoad, you will need to keep in mind that the receivedon won't be automatically filled. You can also look into binding this script to the close window event which will be a bit harder. I'm sure that's possible, who will creat this script for the community?


Remove attributes from form which cannot be removed

There are some attributes on CRM default forms which you cannot remove. This post will show you how you can do this anyway. While doing so, please keep in mind that Microsoft must have good reasons to fix attributes on the form. Removing this might have implications, as always have a good backup ready.

The steps you need to follow to remove are:
- Export customizations for the specific entity
- Modify the form in the customizations xml
- Import the modified customizations

Since most of you are well known with CRM I will skip the Export and Import of customizations. If you need assistance with this, then don't try this change anyway :) To modify the customizations, open the file in notepad or another XML editor. In this file look for this path:

ImportExportXml - Entities - Entity - FormXml - forms - entity - form - tabs

Within tabs look for the tab with the correct name and similar for the sections. Get a bit familiar with the section xml once you have found the correct section. You'll find that there are a couple of lines that you need to remove. This is the example for the subjectid on the case entity:


<cell id="{a9859c32-0cdc-41b5-8e7e-3eb173cab4a8}">
<labels>
<label description="Onderwerp" languagecode="1043" />
<label description="Subject" languagecode="1033" />
</labels>
<control id="subjectid" classid="{270BD3DB-D9AF-4782-9025-509E298DEC0A}" datafieldname="subjectid" />
</cell>


Attributes which are locked on the form includes the following:
case - subjectid
case - contractid
case - contractdetailid

Note: Some of the attributes are used in hidden javascript codes. For instance the case contract contractid is used in the script for the customer onchange. You can also look at removing those scripts from the customizations file.


Walk through all elements on a form

In some cases it is required to set all attributes on a form to disabled or do some other logic like checking which attribute has been changed. To do this you do need to walk through each attribute of the CRM form. My fellow MVP Mitch Milam has posted the technique to do this more than a year ago:
http://blogs.infinite-x.net/2007/11/21/disabling-all-fields-on-a-crm-form/

The most important piece of this code is:


var iLen = crmForm.all.length;
for (i = 0; i < iLen; i++)
{
o = crmForm.all[i];
switch (o.tagName)
{
case "INPUT":
case "SELECT":
case "TEXTAREA":
case "IMG":
case "IFRAME":
if (o.id != "leadqualitycode")
{
o.disabled = true;
}
break;
default:
break;
}
}

This example does set all attributes to disabled, but another option would be to replace the o.disabled = true; line with something like:

if (o.IsDirty)
{
alert("The value of " + o.name + " has changed.");
}

This allows you to determine which attributes have been changed on the form.


Hiding elements: the next evolution

One of my colleagues, Richard McCormick, has written a blog post for the Avanade internal employees. He has asked me to make this post publically available since it might be interesting for more people. Read on and get great code samples on how to hide attributes, elements and sections.

Hiding Links & Controls in CRM 4

Before I go on, I should point out that this solution is technically unsupported by Microsoft as it goes outside the CRM SDK, however the customization is small and easy to reverse to get into a state where Microsoft is supported.

With that said, this post aims to provide a quick JavaScript solution for hiding both controls on a CRM page and links in the left-hand navigation page on an Entity Form.

The code below provides three functions that can be used to show/hide specific items on a CRM form:


var HIDE = 'none';
var SHOW = 'block';

// Function to show/hide CRM controls on a CRM form
// such as text boxes, lookups, pick-lists etc.
function SetCrmControlVisible(elementName, visibility)
{
SetElementVisible(elementName + '_c', visibility);
SetElementVisible(elementName + '_d', visibility);
}

// Fuction to show/hide specific elements on a CRM form
// such as the left-hand link items (More Addresses, Workflows
// and even custom ISV links
function SetElementVisible(elementId, visibility)
{
var elem = document.getElementById(elementId);
if (elem != null)
{
elem.style.display = visibility;
}
}

// Function to show/hide Navigation "Sections" in the left-hand
// links (Such as Sales, Marketing and Service)
function SetParentElementVisible(elementId, visibility)
{
var elem = document.getElementById(elementId);
if (elem != null && elem.parentElement != null)
{
elem.parentElement.style.display = visibility;
}
}

Add the above code to the Entity OnLoad (and ensure that you enable the event) and after that you are ready to show/hide elements on the CRM form.

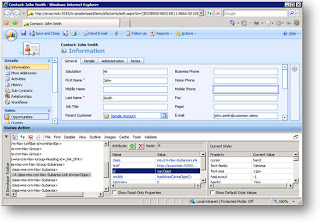
By using the IE Developer toolbar, you can retrieve the id of the element to be hidden (note in IE 8 this come built in and is not a seperate download). Open an entity record (in this case a Contact), press CTRL+N to open it in a new window, and then select IE Developer Toolbar.

Using the controls, select the item you want to hide and get the element id. In this case I have selected the “Opportunities” link and the id is “navOpps


Using this, I can call the SetElementVisible function like this to hide the Opportunities link:

SetElementVisible('navOpps', HIDE);

To hide the entire “Sales” section from the left-hand navigation pane, I can once again find the id, but this time is of the parent item which would result in the following call to hide it:

SetParentElementVisible('_NA_SFA', HIDE);

Lastly, to hide an element on the form such as the “Job Title” field, you once again should use the IE Developer Toolbar to retrieve the element id and then call the SetCrmControlVisible function:

SetCrmControlVisible('jobtitle', HIDE);

By selecting either the textbox or the label, for the Job Title, the returned id will be “jobtitle_c” or “jobtitle_d” – remove everything including and after the “_” and pass that to the SerCrmControlVisible function and you are done!

Happy coding!


Using Advanced Find for FetchXML builder v4.0

Some time ago I have written an article about how to use the Advanced Find as FetchXML builder. Today I tried using the javascript:prompt() method on a CRM 4.0 deployment and found out that the code doesn't work anymore. This alert script does still work though.


javascript:alert(resultRender.FetchXml.value);

A slightly different code which might be easier to remember is:

javascript:alert(document.all.FetchXml.value);

With the popup selected you can press copy+c and paste the result in a notepad window.


Setting the focus to a tab

Today me and a colleague worked on setting the focus of a crmForm automatically to a specific tab. After a bit of research we found that this code works:


crmForm.all.tab1Tab.click();

With this code in mind I looked on the internet and found that my fellow MVP Jim Wang posted that more than a year ago as well :)

Anyway, it works!


Get rid of "Do you want to close this window?"

You might get a question when opening CRM in Internet Explorer. The question is:


The webpage you are viewing is trying to close the window.
Do you want to close this window?
yes no

This message does appear in CRM 4.0 only when you are using Internet Explorer 7.0 and you have enabled the application mode setting. Nevertheless, it is an anoying message which you can get away!

To get rid of this message open the default.aspx file which resides in the root of the CRM website. In this file there are these three lines of code:

var oMe = window.self;
oMe.opener = window.self;
oMe.close();

Modify the second line of this snippet and end up with these three lines:

var oMe = window.self;
oMe.open('','_self','');
oMe.close();

You now will not have the message anymore. Keep in mind that any update or migration might remove this change, but you should be able to reapply the change easily again.


Javascript Files and Caching

You will notice that the performance of Dynamics CRM can be negatively affected when you have loads of Javascript codes embedded into the form of an entity. It is recommended that you take out the Javascript codes from the form and place them in a separate script file which can then be loaded in the form. This will cause the script to be downloaded only once and therefore improve performance when opening the page again. For some info on how to load javascript files in CRM, look at one of my previous posts.

There is one issue though when doing so. When the file has been changed on the server, it will still be cached on the client's machines. You can force Internet Explorer to check the Javascript file to see if it has been changed. One of my German colleagues (Christian Niss) has learned me that it is possible to modify the iis-cache settings for just the javascript file.

If you switch off "enable content expiration" and add a custom http header for the javascript file only:


Cache-Control: max-age=259200, must-revalidate

It should set client side caching of the file to three days (259200 sec), but each time the script is being used the browser must check if a more recent file is available on the server.


Good luck with caching!


Determine the logged in user

Some time ago I wrote a post around how to show and hide fields based on the logged in user. Apparently this doesn't work for Dynamics CRM 4.0 anymore for two reasons. This post will help you to get it working again.

The first one is that you are not allowed to use the <%= approach anymore. You do now have to use the function:

Page.Response.Write(string strText);

The second reason is that the variable "Microsoft.Crm.Security.User.Current.UserAuth.UserId" does not exist anymore. Microsoft has changed the internal structure of how they work with the current user. You now should use this "Microsoft.Crm.Security.User.Current.SystemUserId.ToString()". These two changes lead to the following code

<script language="javascript">
var loggedInUser = '<%Page.Response.Write(Microsoft.Crm.Security.User.Current.SystemUserId.ToString())%>';
</script>

If you do have a single mistake in the aspx page you are changing, then you'll get the following error:

The VirtualPathProvider returned a VirtualFile object with VirtualPath set to '/MicrosoftCRM/sfa/accts/edit.aspx' instead of the expected '//MicrosoftCRM/sfa/accts/edit.aspx'

This has nothing to do with the VirtualPathProvider, it's just that you have a mistake in your aspx page.

Good luck!


Resizing windows

If you have a lot of data on an entity form, then you sometimes do want to force the page to open in full screen mode. There's a small javascript which will allow you to do this. Just add these two lines of code to the form onload of your entity form:


window.moveTo(0,0);
window.resizeTo(screen.availWidth, screen.availHeight);

Also, when you open a custom page you can also set the window size by using the same javascript function. In your code you can use the following function in the Page.OnLoad() to set the window size to match your requirements:

private void SetWindowSize(int iWidth, int iHeight)
{
StringBuilder sbResizeScript = new StringBuilder();
sbResizeScript.Append("\n");
ClientScript.RegisterClientScriptBlock(this.GetType(), "ResizeScript", sbResizeScript.ToString());
}


Happy resizing!


Stopping and continuing a save event

For some customizations you do need to stop the form onsave event, perform some business logic and continue the save event. An example would be that in specific conditions are met when a record is saved, then a popup will need to be shown. After filling in data in the popup and pressing a continue button on the popup, then the save operation would need to continue. The SDK helps in this situation. Look at the following page for more information. MSDN SDK: OnSave Event

On that page you will see that you can stop the onsave event by setting the 'event.returnValue = false'. Don't forget to follow that line with a 'return false'. This will cause the save procedure to stop right at that point. Otherwise statements after that will still be executed.

To call the save event from your javascript code, you can use the javascript functions crmForm.Save(); and crmForm.SaveAndClose(). By looking at the 'event.Mode' you can determine which event was executed before. If the code is 1, then it is a crmForm.Save(); or it is 2 for a crmForm.SaveAndClose(). There's only one small issue. There can be other save events as well. There's the 'save and new', 'save as completed', and also the 'send' for emails. Below is a list of save events with the corresponding javascript functions to call. Once again, this is not documented in the SDK, so this might change with a hotfix or new version.


Save
Code: 1
Function: crmForm.Save();


SaveAndClose
Code: 2
Function: crmForm.SaveAndClose();


Send
Code: 7
Function: send();


SaveAsCompleted
Code: 58
Function: SaveAsCompleted();


SaveAndNew
Code: 59
Function: crmForm.SubmitCrmForm(59, true, true, false);

Good luck!


ForceSubmit in ASP.Net

Today I've been working on a simple IFrame. This IFrame shows 3 dynamic picklists and the data in these picklists is coming from crm. Since some clients are a bit slow, I would like the picklists to be disabled while the postback is being performed. This is easily done with this script:


function disableFields(field1, field2){
field1.disabled = true;
field2.disabled = true;
}

<asp:DropDownList ID="ddl1" runat="server" AutoPostBack="true" onchange="disableField(form1.ddl2, form1.ddl3);">
<asp:DropDownList ID="ddl2" runat="server" AutoPostBack="true" onchange="disableField(form1.ddl1, form1.ddl3);">
<asp:DropDownList ID="ddl3" runat="server" AutoPostBack="true" onchange="disableField(form1.ddl1, form1.ddl2);">

This works perfectly, but... After a postback, the values of the selected picklists are gone! This seems like the same behavior as the disabled fields in CRM. In CRM you can solve this by setting the attribute ForceSubmit to true on the attribute, but I did not know of such an attribute.

Apparently there is such behaviour built into ASP.NET 2.0. In order to enable the submission of disabled form elements, you need to put this line in the Page_Load:

Page.Form.SubmitDisabledControls = true;

For more information on this attribute, check MSDN

Happy disabling!


Javascript and IFrames

I'm struggling with IFrames and JavaScript quite often. When you're working with this as well, the first thing to keep in mind is:

Deselecte the option "restrict cross site scripting" (in dutch "Het uitvoeren van scripts tussen frames beperken")

That usually saves a lot of troubles.

Furthermore, the next step is to create JavaScripts. One which I use quite often, is one which allows me to access a value in the IFrame. This is useful in onSave routines to copy data from the iframe to any of the CRM attributes. This is the code which I use:


crmForm.all.name.DataValue = crmForm.all.IFRAME_CustomIFrame.Document.formname.name.value;

In this example you do need to change the name of the attribute to which you want to save the data to (crmForm.all.name -> crmForm.all.yourSchemaName). The next modification is to change the name of the IFrame. When setting up an IFrame, you do supply a name. Change the IFRAME_CustomIFrame to IFRAME_YourIFrameName. Then on your custom html or aspx page, you do need to access the variable. That you can do by specifying the name of the form followed by the name of the attribute.

For other examples, look at the page of Jonas Deibe Playing around with iframes or Michael Höhne More JavaScript Code.


Change requirement level at runtime

I've made quite some posts around how to dynamically modify the form by using JavaScript. One thing I haven't posted around yet, but what I do use quite often, is to modify the requirement level of attributes on the form at runtime. Based on a selection in the system, another field could become required. Also if the selection changes again, then the field should not be required anymore. Here is the code for making a field optional, recommended or required:


// Set field to not required
crmForm.SetFieldReqLevel("fieldname", 0);

// Set field to business required
crmForm.SetFieldReqLevel("fieldname", 1);

// Set field to business recommended
crmForm.SetFieldReqLevel("fieldname", 2);


Update: new code placed based on the comment by Peter. Before the update I had this piece of code:


// set the field required (i.e. show error message when field is not filled in)
crmForm.all.fieldname.req = 2;

// modify the label to be red
crmForm.all.fieldname_c.className = 'req';


Add New Button on Lookup

Hi Guys,

I’ve been looking into how to enable the ‘new’ button on custom entities. Here is what I have found. O yeah, For the direct solution scroll to the end of the mail.

- You can set test some things when using this url:
http://localhost:5555/_controls/lookup/lookupsingle.aspx?class=null&objecttypes=10001&browse=0&DefaultType=0&ShowNewButton=1&ShowPropButton=1
Ofcourse modify the servername and the objecttypes to match your situation

- The properties and new button can be set by using the querystring parameters as given above.

- There is one additional piece of hard coding in the class Microsoft.Crm.Web.Controls.Lookup.LookupPageBase. This particular piece of code is this:


if (this._showNewButton)
{
for (int j = 0; j < this._objectTypes.Length; j++)
{
switch (int.Parse(this._objectTypes[j], CultureInfo.InvariantCulture))
{
case 1:
this._canCreateAccount = base.CurrentUser.GetPrivilege(Privileges.CreateAccount);
break;

case 2:
this._canCreateContact = base.CurrentUser.GetPrivilege(Privileges.CreateContact);
break;

case 3:
this._canCreateOpportunity = base.CurrentUser.GetPrivilege(Privileges.CreateOpportunity);
break;

case 4:
this._canCreateLead = base.CurrentUser.GetPrivilege(Privileges.CreateLead);
break;

case 0x10cc:
this._canCreateList = base.CurrentUser.GetPrivilege(Privileges.CreateList);
break;
}
}
this._showNewButton = ((this._canCreateAccount || this._canCreateContact) || (this._canCreateLead || this._canCreateOpportunity)) || this._canCreateList;
}

What it does, is looking to the specified list of objecttypecodes and looks if any of these match the id of account, contact, lead, opportunity or (marketing)list. If it does not match one of those, then the new button is hidden.

- You can run the javascript code "createNew();”. This is the same function as that will be executed by the button. Running this javascript will open the quickcreate window which will work.

- You can also modify the file ‘lookupsingle.aspx’. In this file there is the function window.onload() function. Modify this function to add these lines to the end:

//enable new button
btnNew.style.display = 'inline';

This will cause the new button to be visible.

That’s about it. Just add the line above and you’ll be ready to go. The new button will now be available for all entities. I haven’t tested this through so that will need to be done in your situation. Also note that this is unsupported and will not be migrated to a potential upgrade to titan or might be lost after an install of a hotfix.

Hope this helps,

Ronald


Fetching the selected records in a grid

Make sure that you read this page if you want to use the selected values in a grid:
http://msdn2.microsoft.com/en-us/library/bb267367.aspx

Until some time ago I was using one of the functions that CRM uses, but since that is unsupported and the method as described in the article as stated above is supported, I am using the new approach.

In short it comes down to this:


// window.dialogArguments contains an array of the IDs for the
// selected records.
var sSelectedRows = window.dialogArguments;

// If sSelectedRows is empty, do not execute the update.
if (sSelectedRows == "" sSelectedRows.length == 0)
{
alert("You must select records in order to use this feature.");
window.close();
}
else
{
//Do something;
}


Happy coding!


Clone a record

There are some interesting things in the May 2006 Demo VPC that you might not have seen before. One of them is cloning a record. There's an addon written and supplied with the VPC that does take of cloning a contact. I've used it in some other projects and will be using it in my current project again. Ofcourse you can modify the code to match any entity.

I'll add the code here so that you dont have to download the complete VPC. There will be added a piece of code to the isv.config file and an additional file will need to be placed on the server.

Here is the piece that needs to be added in to the isv.config file:


<configuration version="3.0.0000.0">
<Root />
<Entities>
<Entity name="contact">
<ToolBar ValidForCreate="0" ValidForUpdate="1">
<Button Title="Clone Contact" ToolTip="Create a Copy of This Contact" Icon="/CloneContact/contactclone.gif" Url="/CloneContact/CloneContact.htm" WinMode="1" WinParams="dialogHeight:100px;dialogWidth:300px;"/>
</ToolBar>
</Entity>
</Entities>
</configuration>


This is the code that needs to be stored in the file as indicated in the isv.config file:

<html>
<title>Clone Contact</title>

<style>

BODY, TD
{
font-family: arial;
font-size: 12px;
}

TD.body
{
border-bottom: solid 1px #cccccc;
text-align: center;
}

</style>

<script language="javascript">

// Set global variable for the cloned contact window
var oClonedContact;

function window.onload()
{
// Open a new contact form
oClonedContact = window.open('/sfa/conts/edit.aspx','','menubar=0, status=1, width=1000, height=600');

// Set a timeout to wait for the new contact form to load
setTimeout('checkPageState()',100);
}

// Checks if the new contact form has completed loading
// When it completes, CloneContact will be called
// If it's not loaded, it will set a timeout and check again.
function checkPageState()
{
if (oClonedContact.document.readyState == 'complete')
{
CloneContact();
return;
}

setTimeout('checkPageState()',100);
}

function CloneContact()
{
// Get a pointer to the parent window
var oParent = window.dialogArguments;
var oSource = oParent.document.crmForm;

// With the target crmForm
with(oClonedContact.document.crmForm)
{
// Name fields
salutation.DataValue = oSource.salutation.DataValue;
firstname.DataValue = oSource.firstname.DataValue;
nickname.DataValue = oSource.nickname.DataValue;
lastname.DataValue = oSource.lastname.DataValue;
jobtitle.DataValue = oSource.jobtitle.DataValue;
parentcustomerid.DataValue = oSource.parentcustomerid.DataValue;

telephone1.DataValue = oSource.telephone1.DataValue;
telephone2.DataValue = oSource.telephone2.DataValue;
mobilephone.DataValue = oSource.mobilephone.DataValue;
fax.DataValue = oSource.fax.DataValue;
pager.DataValue = oSource.pager.DataValue;
emailaddress1.DataValue = oSource.emailaddress1.DataValue;

// Address fields
//address1_name.DataValue = oSource.address1_name.DataValue;
address1_line1.DataValue = oSource.address1_line1.DataValue;
address1_line2.DataValue = oSource.address1_line2.DataValue;
address1_line3.DataValue = oSource.address1_line3.DataValue;
address1_city.DataValue = oSource.address1_city.DataValue;
address1_stateorprovince.DataValue = oSource.address1_stateorprovince.DataValue;

address1_postalcode.DataValue = oSource.address1_postalcode.DataValue;
address1_country.DataValue = oSource.address1_country.DataValue;
//address1_telephone1.DataValue = oSource.address1_telephone1.DataValue;
//address1_addresstypecode.DataValue = oSource.address1_addresstypecode.DataValue;
//address1_shippingmethodcode.DataValue = oSource.address1_shippingmethodcode.DataValue;
//address1_freighttermscode.DataValue = oSource.address1_freighttermscode.DataValue;

// Professional Information fields
//department.DataValue = oSource.department.DataValue;
accountrolecode.DataValue = oSource.accountrolecode.DataValue;
managername.DataValue = oSource.managername.DataValue;
managerphone.DataValue = oSource.managerphone.DataValue;

assistantname.DataValue = oSource.assistantname.DataValue;
assistantphone.DataValue = oSource.assistantphone.DataValue;

// Personal Information fields
gendercode.DataValue = oSource.gendercode.DataValue;
familystatuscode.DataValue = oSource.familystatuscode.DataValue;
spousesname.DataValue = oSource.spousesname.DataValue;

all.birthdate.DataValue = oSource.all.birthdate.DataValue;
all.anniversary.DataValue = oSource.all.anniversary.DataValue;

// Description
//description.DataValue = oSource.description.DataValue;

// Internal Information fields
ownerid.DataValue = oSource.ownerid.DataValue;
originatingleadid.DataValue = oSource.originatingleadid.DataValue;

// Billing Information fields
//creditlimit.DataValue = oSource.creditlimit.DataValue;
//all.creditonhold.DataValue = oSource.all.creditonhold.DataValue;
//paymenttermscode.DataValue = oSource.paymenttermscode.DataValue;
//defaultpricelevelid.DataValue = oSource.defaultpricelevelid.DataValue;

// Contact Methods fields
preferredcontactmethodcode.DataValue = oSource.preferredcontactmethodcode.DataValue;
all.donotemail.DataValue = oSource.all.donotemail.DataValue;
all.donotbulkemail.DataValue = oSource.all.donotbulkemail.DataValue;
all.donotphone.DataValue = oSource.all.donotphone.DataValue;
all.donotfax.DataValue = oSource.all.donotfax.DataValue;
all.donotpostalmail.DataValue = oSource.all.donotpostalmail.DataValue;

// Marketing Information fields
all.donotsendmm.DataValue = oSource.all.donotsendmm.DataValue;
all.lastusedincampaign.DataValue = oSource.all.lastusedincampaign.DataValue;

// Service Preferences fields
preferredappointmenttimecode.DataValue = oSource.preferredappointmenttimecode.DataValue;
preferredappointmentdaycode.DataValue = oSource.preferredappointmentdaycode.DataValue;
preferredserviceid.DataValue = oSource.preferredserviceid.DataValue;
preferredequipmentid.DataValue = oSource.preferredequipmentid.DataValue;
preferredsystemuserid.DataValue = oSource.preferredsystemuserid.DataValue;
}

// Finally, close the dialog
window.close();
}

</script>

<body>

<table width="100%" height="100%" border="0" cellpadding="0" cellspacing="0" align>
<tr valign="middle">
<td class="body" align="center">
<div style="font-size= 10pt; font-family= Tahoma;">Cloning Contact...</div>
</td>
</tr>
</table>

</body>

</html>


It's just a free addon from Microsoft, so use it if you can :)


Modifying the history (associated) view filter

One of my friends, Michael Höhne, has blogged about how to change the default view of the associated view. This is a very common requested feature, also by my clients. Usually I inform them that it is not possible to change it, but that will change as of today. Take a look at the post at this address be thankful that Michael is willing to share all the codes just for the community :)

http://www.stunnware.com/crm2/topic.aspx?id=JS11


Using the Advanced Find for FetchXML builder

Some time ago I talked about the program "FetchXML builder" to build FetchXML queries: http://ronaldlemmen.blogspot.com/2006/09/fetchxml-builder.html, but take a look at the next solution.

You can just open the Advanced find page and build the query as you like. Then run the query to see if it returns the data as you wish it should. If you are satisfied with the results and you want to know what query was sent into the CRM Framework, then press F11 to get the address bar and enter this script and press enter.


javascript:alert(resultRender.FetchXml.value);

If you get a warning about leaving the page, just press 'ok' and then the query which is sent to the framework opens up in a popup. Unfortunately you cannot select the text to copy and paste. But with Windows XP and Windows Server 2003 you can copy all text on the popup by clicking somewhere on the popup (not on the button "OK" ofcourse) and pressing ctrl+c. Now in notepad you can paste the text of the FetchXML.

Good luck!

Update: Thanks to Piotr in the comment section I have learned the javascript prompt command. Try this instead of the alert:

javascript:prompt("my query:", resultRender.FetchXml.value);


Accessing webservices via Javascript (aka AJAX)

Several times I've been asked, or saw the question on the newsgroups, how to create a piece of javascript code which retrieves data from a webservice. This information has been included in the SDK and you'll be able to find it here:

http://msdn.microsoft.com/library/default.asp?url=/library/en-us/CrmSdk3_0/htm/v3d0accessingwebservices.asp

Here's the code example of that page:


// Declare variables.
var i=0; var j=0; var k=0; var r=0;
var serverUrl = "http://www.webservicex.net";

// This is the picklist.
switch (parseInt(event.srcElement.DataValue, 10))
{
case 1:
i = "JPY";
break;
case 2:
i = "GBP";
break;
case 3:
i = "EUR";
break;
}

// Instantiate at connection to the Web service and call the get method.
var xmlhttp = new ActiveXObject("Microsoft.XMLHTTP");

xmlhttp.open("get", serverUrl + "/CurrencyConvertor.asmx/ConversionRate?FromCurrency=USD&ToCurrency="+escape(i), false);
xmlhttp.send();
var startTag = "<double xmlns=\"http://www.webserviceX.NET/\">";
var endTag = "</double>";
var exch;
var valueStart = 0;
var valueEnd = 0;

// Parse the returned XML string.
valueStart = xmlhttp.responseXML.xml.indexOf(startTag, valueEnd) + startTag.length;

valueEnd = xmlhttp.responseXml.xml.indexOf(endTag, valueEnd+1);
exch = xmlhttp.responseXML.xml.substring(valueStart, valueEnd);

// Set the Exchange rate on the custom attribute.
crmForm.all.fabrikam_exchangerate.DataValue = parseFloat (exch);
j = crmForm.all.totalamount.DataValue;
var kk = j*(parseFloat(exch));

// Calculate and set the total sum in the selected currency.
crmForm.all.fabrikam_totalcurrency.DataValue = kk;